TeleForm FAQ's
Remote working
How to access TeleForm Workgroup when working from home
The best way to experience TeleForm is when the software and hardware is located on the same physical network. This is because TeleForm is designed for high volume and high-speed forms processing where images and many small transitions are performed by client PC’s over the network. The limited bandwidth of remote connections is a problem here, but more significant is the inherent latency of remote connections, which can slow applications such as the TeleForm verifier to an unacceptable level.
However, it is possible to connect remotely over a VPN.
This can be used where a connection to a physical scanner is necessary and where latency is not such an issue, such as scanning. You will need a USB scanner for connection to your home PC. Once the scanner is configured (and the VPN is set-up), you can scan forms via the TeleForm Scan Station on your PC, with the images sent to the TeleForm server over the VPN connection.
With scanning complete, the remote desktop connection to your office PC runs the high-volume parts of the process that require a low latency connection, such as the TeleForm Reader and Verifier. With RDP, even over a standard consumer broadband connection, it is possible to have a near-normal verification experience, with images displaying and the Verifier responding to keystrokes with only the slightest delay.
Additionally, a number of alternative solutions are available for TeleForm users scanning from home or distributed sites. These include:
- TeleForm Web Capture Option (WCO), to allow users to remotely scan into the TeleForm application through a browser.
- eScan, to provide scanning, reconciliation, image QC and transmission of scanned forms back to the TeleForm Reader from many distributed locations.
- eForm Suite, to create intelligent PDF and HTML forms. An add-on module for TeleForm and integrated with the Designer module, it allows you to export a form template as an electronic form in Acrobat PDF or HTML format. All fields created in the TeleForm Designer are converted to electronic fill-in fields with business rules automatically applied.
Server specification
What are the minimum system requirements?
The recommended system specification for a TeleForm Workgroup Server are:
- Dual core Xeon CPU
- 4GB RAM (8GB if also hosting SQL)
- Windows 2012 R2 server
- Microsoft SQL server 2012
- 10GB free hard drive space
- 100 Mb/s network card with non-routed connection to clients
What is the server's function?
Although never a supported configuration, older versions of TeleForm allowed the TeleForm Reader or TeleForm Designer etc. to run on the server. However, the TeleForm V9 and above server acts purely as a store for the files and data of your system with no OCR or image processing performed.
The only TeleForm modules that will run on the server are TeleForm Monitor and License Service, neither of which require much RAM or processor time. This means that the most important specifications of a TeleForm server are memory and hard drive speed as they support the SQL database and file system.
How much memory do I need?
A clean installation of a Windows Server will typically use less than the first 1GB of RAM for normal operation. This means that the remaining RAM will be used by the SQL server. On a clean server, a total of 2GB (1GB for Windows and 1GB for SQL) should be workable but if other applications are running such as Exchange or an on-line defragmentation tool, it is important to have additional memory capacity.
Bear in mind that it is possible to have more than one "instance" of SQL running on a server and each will require its own memory, although multiple databases on one "instance" will share memory. Some applications such as the McAfee ePolicy Orchestrator virus scanner management tool or Symantec Backup Exec may install their own instance of SQL Express, to store information and statistics, which will require its own memory in addition to the TeleForm instance!
SQL Server will automatically use all available memory, so if you have 2GB of RAM in your server and SQL is using up all available memory it doesn't necessarily mean that expanding your memory will result in a performance increase.
How much hard drive space is required?
A clean installation of a Windows Server will typically use less than the first 1GB of RAM for normal operation. This means that the remaining RAM will be used by the SQL server. On a clean server, a total of 2GB (1GB for Windows and 1GB for SQL) should be workable but if other applications are running such as Exchange or an on-line defragmentation tool, it is important to have additional memory capacity.
Bear in mind that it is possible to have more than one "instance" of SQL running on a server and each will require its own memory, although multiple databases on one "instance" will share memory. Some applications such as the McAfee ePolicy Orchestrator virus scanner management tool or Symantec Backup Exec may install their own instance of SQL Express, to store information and statistics, which will require its own memory in addition to the TeleForm instance!
SQL Server will automatically use all available memory, so if you have 2GB of RAM in your server and SQL is using up all available memory it doesn't necessarily mean that expanding your memory will result in a performance increase.
How fast should my computer run?
Although none of the TeleForm modules are compiled for 64bit or dual processor support, the operating system and SQL server can take advantage of them, if you have the right versions. The speed of the processor will also have an effect on performance but unless you are planning on processing in excess of 10,000 forms per day, any modern processor will be suitable (assuming the server is dedicated to TeleForm).
What version of windows is needed?
Windows 2000 or 2003 Server is required. Any edition including Standard or Advanced will work. We recommend you install the latest updates from the Windows Update website.
Although not a certified configuration, we have successfully installed the V9 Workgroup onto Windows NT4 servers with an existing SQL server available. V10 or above has not been tested in this way.
What version of SQL server is necessary?
TeleForm Workgroup will run with any version of SQL Server 2000 or above, including the free MSDE or Express versions. TeleForm Enterprise requires the full SQL Server 2000 and will not work with the free MSDE version.
Workstation specification
What is the recommended specification for TeleForm Workstation?
The recommended system specification for a TeleForm workstation running Designer, Scan Station, Reader or Verifier are:
- Quad-core i5 CPU with 4GB of RAM and Windows 10
- 10GB free hard drive space
- 100 Mb/s network card with non-routed connection to the server
- 19" monitor or larger recommended for Verifier workstation
Scanning
One or more of your PCs will also need to interface with a scanner. Currently most scanners require a USB 2 or 3 port and although using a port of a lower version will work (the connectors are physically identical), it will slow the scanner quite considerably. Older PCs may only have USB 2 ports and many, even with USB 3, will also have USB 2 ports as well. So ideally always make sure the PC has USB 3 ports and that the scanner is connected to one of the USB 3 ports and not a slower USB 2 port.
What size monitor should I use?
Computer screens are often the last thing to be considered when purchasing a new PC and yet they represent probably the most important function a computer can fulfil - providing you with information.
The size and quality of screen is primarily dependent on what information you need to see at any given time. If a Verifier operator works on a very basic form where only a small number of fields or characters are reviewed then a 17" monitor should be acceptable. However, some of the more complex forms and systems may require additional "pop up" windows or operators may need to see information from other sources while verifying certain fields. In this case, running the TeleForm system at a higher resolution will enable more information to be viewed at once but in turn will shrink the details to scale and become harder to read. As a result a 19" or larger monitor should be considered.
Employers have growing responsibilities for the welfare of computer operators and can be found liable if an employee suffers eye strain or other problems as a result of insufficient or faulty VDU equipment.
How much memory do I need?
In a distributed TeleForm environment such as Workgroup, specific tasks are carried out on different PC's. Hard drive space requirements are different dependent on what function is being performed.
Designer, Reader, Scan and Verifier
Free hard drive space is not crucial above the minimum recommended 500MB as images processed through the client modules are only downloaded a few at a time from the TeleForm server.
Server
The hard drive capacity of the server is critically important.
The TeleForm server is where images are stored during the scan/read/verify process. Depending on your system set–up, it may also be used for long term archival of the extracted data and images. The average TIFF image of a scanned A4 form at 200dpi in black and white is around 40KB. As a result, the server will need 40MB of hard drive space for every 1,000 forms. This requirement increases if you have a requirement to scan and store high resolution images.
Hard drive performance makes a difference to system performance and is inherently slower that RAM or a processor. Have a look at our Server Storage FAQ form more information.
Graphics Cards
Most PC's capable of running Windows will contain a graphics card which meets the minimum TeleForm requirements.
What are the hard drive requirements?
In a distributed TeleForm environment such as Workgroup, specific tasks are carried out on different PC's. Hard drive space requirements are different dependent on what function is being performed.
Designer, Reader, Scan and Verifier
Free hard drive space is not crucial above the minimum recommended 500MB as images processed through the client modules are only downloaded a few at a time from the TeleForm server.
Server
The hard drive capacity of the server is critically important.
The TeleForm server is where images are stored during the scan/read/verify process. Depending on your system set–up, it may also be used for long term archival of the extracted data and images. The average TIFF image of a scanned A4 form at 200dpi in black and white is around 40KB. As a result, the server will need 40MB of hard drive space for every 1,000 forms. This requirement increases if you have a requirement to scan and store high resolution images.
Hard drive performance makes a difference to system performance and is inherently slower that RAM or a processor. Have a look at our Server Storage FAQ form more information.
Graphics Cards
Most PC's capable of running Windows will contain a graphics card which meets the minimum TeleForm requirements.
TeleForm backup
How do I backup TeleForm?
Backing up servers and workstations is a more complex process than often understood. Simple backup applications such as the Windows built in Backup utility and even commercial utilities such as Symantec (Veritas) standard Backup Exec application are unable to provide as complete a backup solution as often believed. Many users will run a "full" backup and believe that they are covered. In reality, they have a partial data backup which can't be restored without a time consuming manual operating system and application re-installation first.
The reason for this is twofold; firstly most backup solutions are unable to backup open files. Even if they could, systems such as TeleForm that rely on multiple file databases such as Pervasive SQL, would require each file of the database to be backed up in its entirety simultaneously to avoid corrupt data. If you imagine a large data file being backed up whilst it is still being written to or a data file being backed up whilst another relational table is being updated you will see that traditional on-line backups can be plagued with corrupt data.
Secondly, even if the backup were complete and not corrupt, restoring it would be a much more complex process than often believed. It is impossible to boot and restore a system from a tape drive alone, so it usually requires a manual operating system and application re-installation before the data can be restored.
So, TeleForm can't be backed up?
Not in the traditional nightly backup sense! Open files, constantly changing data and complex restorations, all contribute to making backup impractical in most cases.
TeleForm isn't a storage system. In most well implemented systems, the images and data should only be held within TeleForm for a short period between scanning or capture of the form and verification. So, although it is not easily possible to back up a TeleForm system, this shouldn't cause much live data to be at risk.
What should be backed up?
The most important part of any TeleForm system is the form templates. It is imperative that as you activate a form, it is simultaneously exported to a backup store. Future changes to the forms will require further backups but it is important to get in to the habit of backing up every time a form is modified. This can be done either manually from the TeleForm Designer or by using the TeleForm migration tool which can bulk export all forms and settings from a system.
It is also essential to back up the exported data and retain paper or fax original forms until after the captured copies are verified. Paper can simply be kept for a period and most fax servers such as ZetaFax can archive all received faxes.
These simple steps should be all that is required to provide a good level of disaster recovery:
- Restoration will require a manual system re-install
- Importing the form templates
- Re-evaluating the images
Is there really no way of backing up TeleForm?
There are more complex solutions for backing up TeleForm software such as a mirroring cluster setup OR High Availability system.
Within TeleForm, there are three components that you need to configure for High Availability:
- TeleForm Database (SQL)
- TeleForm File store (Windows file system)
- TeleForm License Service
TeleForm Enterprise (not Desktop or Workgroup) supports clustered SQL servers and clustered file stores. See below a diagram of how this could be configured to give the best available fault tolerance.
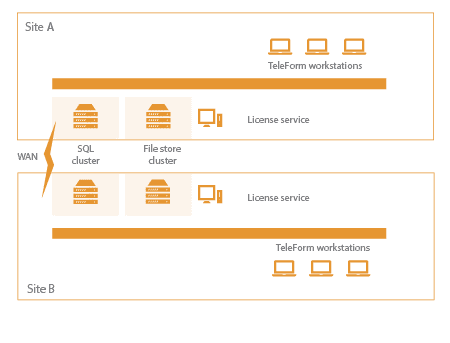
Although this type of clustering will give ultimate fault tolerance (even tolerating a complete system loss at either of the sites), it does require planning and considerable additional investment in both hardware and software. It is worth noting that not all versions of SQL server or Windows Server support clustering in this configuration, so it is important to plan this type on installation from the start.
In addition to clustering the SQL and file stores, it is also worth noting that if the License Service machine fails, there is a two-week grace period in which the license service needs to be bound to another machine before the TeleForm clients will fail to start.
Scanners
I need to purchase a scanner for TeleForm. What do you recommend?
There are four main classes of document scanner that ePC recommend for use with TeleForm.
- Network Scanners
- Entry Level
- Mid-range
- High End
We strongly advise against purchasing flatbed scanners and recommend investment in a high-speed document scanner.
Network Scanners
If high throughput of more than a few hundred pages per day is required, we recommend investment in dedicated high throughput scanners.
In some cases, if a relatively low throughput is required, Network scanners are an ideal solution. They allow the people scanning the forms to submit them with a near one button process. This is ideal if scanning is to be done throughout several branches or locations and the staff submitting the forms are not involved in the verification process. They can simply walk up, place the pages on the feeder press a button and walk away.
The HP Digital Sender is an ideal unit for this kind of installation and costs approximately £2,000.
Entry Level
In the entry level range of scanners, although most scanners are duplex, you are limited to A4 only. SCSI has traditionally offered a more robust and efficient connection method but the growing popularity and cost effectiveness of USB’s has seen the device lead the entry level scanning market. These scanners have a capacity of up to 100 pages at a time and will scan duplex at up to 45 pagesper minute. They are suitable for small systems where up to a thousand pages are scanned each day.
A good example is the Panasonic KV-S1028Y which costs approximately £450.
Mid-range
Mid-range scanners increase the scanning speeds and the number of pages that fit in the automatic document feeders in addition to providing A3 options. The Panasonic KV-S2087U is ideal for A4 scanning from a 200 page feeder at 85 pages per minute and costs around £1,200 while the Kodak Alaris i3200 costs £2,500 and allows for A3 scanning.
High End
At the very high end, production scanners support the scanning of hundreds of thousands of pages per day at rates of over 100 pages per minute from 500 or 750 page feeders but costs are often in excess of £10,000 at this level.
How to clear a paper jam in your scanner
The first thing is to give the paper path a good clean and inspect for any dust, bits of paper, damage or other foreign objects.
Some scanners have a switch to set it to scan different types of paper. For example, a “card” setting for scanning thick paper and card. Others have a “straight-through” scanning path to save the paper going around the roller (it effectively goes straight through and out the back of the scanner rather than coming out the top). We advised you to check these have not been dislodged by accident.
Is the paper any different from usual? Sometimes the paper texture, thickness, punch-holes or even damage caused by removed staples can be an issue. The best way to exclude this possibility is to scan normal 80-100gsm copy paper to check if it goes through any better.
Dependant on the results of the above tests, we advise you to try and understand where it is failing.
Sometimes it is the picker-rollers and it fails to pick-up the page and stops. It varies by scanner, but this is usually noticeable because the rollers continue after the paper stops for a second or two (i.e. they rollers are running but the page does not go through them). The other common issue is where the page goes into the scanner and it jams for some reason, usually indicated by an audible grinding as the rollers are forced to a stop by the offending sheet.
Choice fields
What are TeleForm choice fields?
Choice fields are a highly-used type of field in TeleForm. They use OMR (Optical Mark Recognition) technology to detect ticks/checks/marks to determine whether or not a box is ticked. Typical examples of choice fields are:
- Yes/No responses
- Gender responses
- Satisfaction scoring (unsatisfied, neutral, satisfied)
A choice field in TeleForm can have any number of choices which can be arranged freely on the page. TeleForm has a variety of different styles for you to choose from:
- Bubbles: these are small circles or ovals. Expected inputs are full shading, crosses or ticks
- Boxes: the small squares or rectangles have expected inputs of crosses or ticks
- Underlines: less frequently used, TeleForm displays a small horizontal line on which the expected input is a tick
- Responses: these types expect the choice text to be circled. These were common a few years ago for Title style fields (Mr, Mrs, Miss, Ms, etc.)
- Brackets: very seldom used. TeleForm will print a pair of brackets on the page with the expected input being a tick or a line between them.
The order of the different types in the list above is by popularity of use, and also by preference of use. It is much better, from a recognition accuracy point of view, to use bubbles and boxes than responses and brackets. The response field can be particularly problematic as it becomes unclear to some users whether they should circle their chosen response, or whether they should cross out the inappropriate ones. In addition, a response field requires the user to circle reasonably neatly close to the text.
For these reasons, a closed shape (such as a bubble or box) will always perform better and more accurately than an open shape (such as a response or bracket).
How does TeleForm recognise whether a choice is ticked or not?
Every time TeleForm needs to process a choice field, it will look at each of the choices and literally calculate how much of the choice actually contains ink. It returns this calculation as a percentage. For a bubble choice that has been completely filled in, this will then return a 100% result. For a neighbouring choice that is completely empty, a result of 0% is returned. Such extremes are easy when determining if something is ticked or not. For percentages between these extremes, TeleForm uses a scale with thresholds. The default values for these thresholds are 40% and 25% (called Mark Fill High and Mark Fill Low respectively).
- If the percentage of ink within the choices is calculated to be more than or equal to the Mark Fill High (40%) then the choice is considered to be definitely marked and TeleForm won’t ask the Verifier operator for confirmation (unless more than one mark is detected for a single-choice response).
- If the percentage of ink within the choices is calculated to be less than the Mark Fill Low (25%) then the choice is considered to be definitely empty, and TeleForm won’t ask the Verifier to confirm (unless the choice field is set up as "Entry Required").
- If the percentage of ink is detected to be within the Mark Fill High and Mark Fill Low values, then TeleForm will consider the choice to be ticked, but will ask for confirmation from the TeleForm Verifier operator.
| Example marks | Percentage | Decision |
|---|---|---|
| |
99% (MORE than 40%) |
DEFINITELY FILLED |
| 41% (MORE than 40%) |
DEFINITELY FILLED | |
| 28% (BETWEEN 25% and 40%) |
FILLED BUT UNSURE | |
| |
24% (LESS than 25%) |
DEFINITELY NOT FILLED |
| |
1% (LESS than 25%) |
DEFINITELY NOT FILLED |
The thresholds of 25% and 40% are TeleForm's default settings. As can be seen from the table above, they aren't necessarily the best settings as the 21% mark has been considered to be definitely not filled. The thresholds are generally designed for fields that are either filled in completely/crossed, or completely empty. Generally, tick marks are very popular in the UK which don't generally present very high percentages, particularly if they aren't well formed within the bubbles/boxes.
For this reason, it is a good idea to adjust the thresholds slightly. The actual figures to use will vary wildly on the types of form, scanned or faxed images, etc. You must run your own testing to determine the best values. However, ePC generally recommend adjusting the Mark Fill High from 40% to 30%, and the Mark Fill Low from 25% to 20%
It is also best to change the settings below on a form by form basis.
Designer-->Form menu-->Properties-->Form Level Settings tab-->OMR thresholds-->Form Level
What happens if a single-choice field has too many marks?
If a field is set up for single-choice only, TeleForm will only let one choice value to be exported to the database. In the event that multiple marks are detected (as in the example below), TeleForm will automatically push the form to the Verifier so that a user may decide which of the options is the intended choice.

In this particular case, it is likely that the form user crossed box B initially, then changed their mind before scribbling over the initial response and then crossed D. It would be unsafe for TeleForm to assume either B or D. In this case, the form will be automatically sent to the Verifier for human-intervention.
How are choice values exported to a database?
For single-choice fields (where only a single choice is acceptable), data exported to the database uses the "Store in database as" value.
For multiple-choice fields there are three ways of exporting data:
- Single Column Variable: Multiple values are exported to a single field, separated by commas
- Single Column Fixed: Multiple values are exported to a single field, however, all values are separated by commas regardless of whether they are ticked or not, but only ticked values are visible
- Separate Columns: Multiple ticked values in a field are exported into separate columns, with 1=ticked, 0=unticked.
| Example | Single column variable colour | Single column fixed colour | Separate Columns - Red | Separate Columns - Green | Separate Columns - Blue |
|---|---|---|---|---|---|
 |
,, | 0 | 0 | 0 | |
 |
Green | ,Green, | 0 | 1 | 0 |
 |
Red, Blue | Red,,Blue | 1 | 0 | 1 |
 |
Red,Green,Blue | Red,Green,Blue | 1 | 1 | 1 |
Comments fields
How do I capture data from comments fields?
When designing questionnaires for high speed data capture, TeleForm users often have to incorporate some way of capturing data from unconstrained fields.
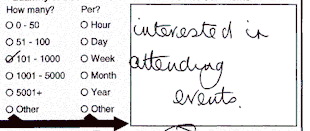
Open Handwritten Fields
This may be for giving respondents an extra unclassified option for a choice field:
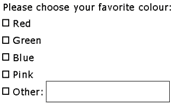
For capturing a field too large to fit in as a constrained print field:
![]()
Or for capturing general comments:

Whichever type of free text field you have on the form, capturing the data from it can be a very manually intensive process. The first question you must ask yourself when designing the form is whether can you use another field type to capture the data. So in the first example, you could simply add "Yellow" and "Black" to the choice field options. In the company name example, you could add a second line using two constrained print fields and group them using a data group:

We often get asked for advice on capturing cursive handwriting, usually in the form of "Other Comments" questions on forms.
Sometimes the requirement is to capture only a couple of words, for example a "Qualification Title" question, where a constrained print field may not allow enough characters within the width of a page. Either way, we have recently been working with A2iA, a leading provider of cursive handwriting recognition software, to provide another way of dealing with these fields. With the addition of A2iA, the options for capturing these fields are:
A2iA
ePC can integrate the A2iA FieldReader and DocumentReader toolkits in to TeleForm to read a variety of different field types, using Intelligent Word Recognition (IWR). Reading individual characters from an image of joint-up handwriting is almost impossible, so A2iA relies on dictionaries to match whole words, which provides far greater accuracy and tolerance for varied handwriting styles. Dictionaries of many thousands of words can be used, built even from a simple list of commonly used words in the English language but efficiency is really improved where the dictionary is more targeted, for example a list of all educational establishments and related words, for capturing an education history on an enrolment form.
The A2iA toolkits are priced on a per-field throughput basis, with licenses starting from £2,995. This will allow, for example, a maximum of 10,000 documents, each with five fields, to be processed each month.

Capture images
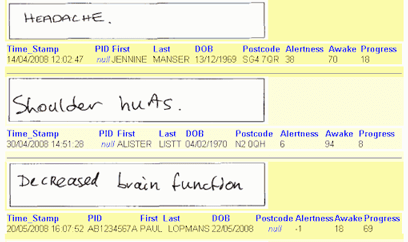
Often the comments are only needed for future reference or archival purposes. As open qualitative text like this is rarely useful for statistical or processing purposes, we often find storing an image of the zone to be the quickest and most effective method of capturing the information. These image zones can then be stored in our eStore image archival system and made available for simple human reading or incorporation into reports, searchable or filterable by any field on the form (for example you may want to only read comments from Site A who rated overall satisfaction below 50%).
The capture and storage of these types of images is a standard function of the TeleForm software but the addition of eStore, for web based searching and retrieval, starts from £2,995.
Coding / categorising
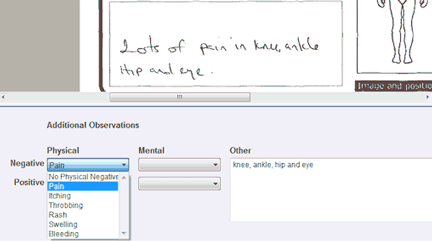
You may need the form recipient to respond in an open-text format but would like to perform statistical analysis or further processing of this data. For this, the Capture Zone may be the best option as it allows you to build one or more sub-fields with which an operator can categorise or code the response into a standard format. This allows complex qualitative data to be stored within a standard format, not only allowing better analysis but also reducing the time to capture this information down to a few mouse clicks.
As with any of these options, it is sometimes necessary to combine it with another method to allow capture of entries that perhaps fall outside your pre-defined categories. In that case a Key From Image field could also be used, allowing the operator to key in the full text data if required.
Predictive keying
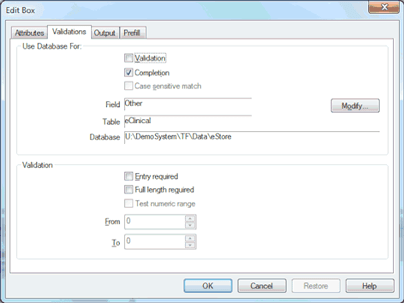
Where you need to capture open text data but it is likely to be of a short nature, such as company names, qualifications or job titles, TeleForm has an auto-completion mode for its Key From Image fields. This allows TeleForm to automatically complete a field for you, based on the first few key strokes, by looking up matches from a pre-defined database, possibly including responses from previous forms.
The added benefit of this method is that entries are automatically standardised, regardless of the wording used. For example; "ePC", "ePartner Consulting" and "ePartner Consulting Ltd" could all be exported as "ePartner Consulting Limited" with only two key-strokes.
Key from image (KFI)
If the full text data is required to be stored in digital format, the Key From Image fields can be used to allow the operator to key in the verbose text from each image. If used in conjunction with one of the other options above, this would only be used to manually key the exceptions; hopefully the majority can be captured through A2iA, coding or image capture for example.
Although keying many fields in this way would slow your data capture process down quite significantly, it would still be much quicker to capture them this way than keying from paper in to a database. Shuffling paper and having to keep looking away from the screen is inherently slow and error prone. However, having each image automatically zoomed to the Capture Zone and displayed on screen while you key the data before a single key press immediately brings up the next image is far more efficient and reliable.
Whichever option you ultimately decide to use, it is worth taking a progressive approach with multiple methods rather than unnecessarily forcing all data through one method. Perhaps Coding or A2iA could be used to capture as many as possible with a second level of key from image available only for the ones that can't be captured as the first level.
It is also worth considering how you will store this data and how it will ultimately be used. There is no point in wasting time manually keying thousands of comments if the data is only going to be stored in SPSS for graphing purposes. In the cases where comment data is going to be included on a report, would an image of the comments suffice? It still allows the recipient of the report to read the comments but with the added advantage that they can see them in their original form, with no possibility of transcription errors.
If you would like further information on A2iA integration or advice on how to capture your open text fields, please contact us.
Is the captured data worthwhile?
If it is a more general "Other Comments" type field then you really need to consider how you wish to use the captured data. Today's technology isn't capable of reading jointed handwriting accurately, so capturing this kind of information is going to require a large element of manual interaction.
The first thing to consider is once you have captured the data, is it going to be of any use at all? For example, on a cinema customer satisfaction survey, you might get respondents entering "The seats were too cramped" or "The chairs were too small" and fifty other comments all meaning the same thing, but written differently. Once you have this data in Excel, Access, SPSS etc. it is completely useless from a statistical analysis point of view, as you won't be able to generate a graph of how many people thought the seats were uncomfortable.
Capturing images
If the data is not being used for statistical analysis, it might be needed for review purposes. What we mean by this is that the comments are there purely for someone to read and take on board.
If TeleForm is being used in a small department or company, it is likely that the operator of the TeleForm system will also be the person who needs to read the comments. If this is the case it is often a workable solution for the field on the form just to be a graphic box object with no recognition and the scanner operator can simply read the comments as the pages are scanned.
If, however, the TeleForm operators are not the same people who need to review the comments, perhaps in a bureau scenario, it may be important to get the comments sent to another department or location. Rather than capture the writing as data a much more efficient solution would be to capture an image of the writing and pass this on to the reviewers.
At the most basic level, it would then be possible to pass a CD on to the reviewer with all the completed ‘Other Comments’ boxes which could be viewed and read from the original handwriting. Better still, if these images where uploaded to eStore the reviewer could generate printable reports based on search criteria such as "all the other comments from male respondents aged between 18 and 65".
Capture Zones (SKFI)
If the ‘Other Comments’ are not just simply for review purposes there are several ways of capturing the information without having to resort to manually keying every single letter in. The first option is to categorise or code the responses using a Capture Zone.
This allows the TeleForm operator to look at the handwritten response and summarise the information into one of a pre-defined list of options. Whilst this does mean that every completed ‘Other Comments’ box will require human interaction, it will at least only be two mouse clicks or key strokes. It is also possible to combine a categorising system with a free text entry field so that if the TeleForm operator can't find a suitable category they can type the data in.
Predictive Typing
If the data being captured is a more restricted response, such as a company name field, it is possible to utilise predictive typing.
If the "Completion" option above is ticked, as soon as the TeleForm operator enters the first character it will perform a look up to a database and predict what the operator is typing, refining its prediction with each further character entered. In most cases, it will find a positive match within two or three keystrokes allowing the operator to accept it and move on to the next form in only a couple of key strokes. It is possible to export the final value to the lookup database so it will learn new entries if they aren't already in the database. Obviously this isn't suitable for open ended ‘Other Comments’ boxes, but will save a lot of time capturing data from Existing forms or fields where you can't use Constrained Print fields.
Lastly, using the Pre-fill tab on a Capture Zone can help save a few key strokes, especially if you are processing a batch of forms that are all from the same respondent.
For example, a temp completing their work time-sheets for the month will submit four or five time-sheets with the same company name on each. Selecting the "Pre-fill With Last" option will save the operator having to enter the data for each timesheet.
So, please ask yourself:
- Do you really need an Other Comments box?
- Is there a better, more constrained field you can use?
- Do you need to capture the text or will an image do?
- Is the captured text any use to anyone anyway?
- Can you categorise responses?
- Can you use predictive typing or pre-fill?
Design tips
I want to design a new form. Can you provide some design tips?
It is easy with data capture form design to get into bad habits. However, there are some things worth checking to gurantee your data capture form produces accurate data from the first draft. Here are some useful tip to achieve perfect forms.
Position form ID blocks at the top and bottom of every page
The default position for Form ID blocks in TeleForm is the top left of every portrait page. Unfortunately, staples, folds and rips usually occur in this position. For optimum recognition, please keep blocks clean for document scanning.
The best solution is, space permitting, to instruct TeleForm to place the Form ID blocks in the top left and bottom right corners of the page. If an Form ID block is damaged, the alternative may still be readable. This helps reduce form identification problems.
Avoid using lettering, numbering and shading within choice field bubbles
When placing choice fields as bubbles or boxes on a form, putting lettering, numbering or shading within the fields can affect recognition. It is always best to leave them completely empty, so that any marks within the boxes or bubbles will be made only by the person filling in the form.
How to design choice fields:
![]()
How not to design choice fields:

We do not recommend Courier font for pre-filled fields.
A useful feature in TeleForm is the ability to merge data from a database onto a pre-filled form. Auto merging is similar to standard mail merges and allows you to pre-print bulk quantities of forms for distribution.
However, TeleForm's default font for pre-fill text is Courier which is not the best font for form recognition.

We recommend changing the fonts for merge/prefill fields to a sans-serif font like Arial or a machine-readable font such as OCR-A.


Take care when adjusting choice field recognition thresholds
Choice field recognition in TeleForm works by calculating how much ink is marked within a choice bubble or box. This is expressed as a percentage. The default settings or "thresholds" for these percentages are as follows:
- Percentage above 40% - TeleForm considers the choice bubble/box filled
- Percentage between 25% and 40% - TeleForm will ask the user for confirmation whether the choice bubble/box is filled (it will assign the choice field to the Verifier)
- Percentage lower than 25% - TeleForm will consider the choice bubble/box to be empty.
The two default values of 40% and 25% are called Mark Fill High and Mark Fill Low respectively. It is possible to adjust these values for each field, form or across the whole system. Lowering both values will make the system more sensitive to even the smallest of marks. If the threshold are close, TeleForm will be more decisive whether a bubble/box is ticked or not.
However, any changes you make to these Mark Fill High and Mark Fill Low values should be extensively tested.
Use database lookups and dictionaries where possible
TeleForm can check form data is correct before export.
- Dictionaries and database look-ups can be used for print fields to validate that the data read is good
- Check that words have been spelt/recognised correctly. The county of Surrey may have been misread by TeleForm as "SVRREY". A dictionary of counties could be linked to the field and TeleForm could be instructed to make automatic corrections
- Check that data read on a form is valid by comparing the data in a database. A list of candidates, patients; a table of medications; order codes etc. These are possible examples of a database look-up.
TeleForm can be instructed to ask for confirmation from a user or alert the user if the data is invalid. Automated look-ups and dictionary corrections can vastly reduce the amount of data for your staff to check and manually correct.
Export additional TeleForm field data
Every form created within TeleForm contains a whole array of "virtual fields" which are placed within each new form, yet none of them have any physical appearance on the form design. They are used for tracking purposes and although many of them remain blank through the entire document scanning and data export stages, some are available to set-up for export into your databases.
The most useful ones are:
- Time_Stamp: this holds the time and date the form was scanned
- Suspense_File: the image filename as stored within the TeleForm folders. If scanned in batch mode, it contains the full path including the batch directory. If in non-batch mode, the image filename is provided (all non-batch images are stored in the \ Sus \ directory within TeleForm
- BatchNo: the batch number is useful for your own tracking purposes. After document scanning, you can place the paper batches in folders, labelled with the batch number and locate paper copies when required. This field is evidently blank in non-batch mode
- BatchPgNo: the batch page number records which page number the data refers to
- Verify_Wks: On multi-user systems, this field contains the name of the workstation that last verified the data.
Use page link fields on multiple-page forms
Consider a two-page form design. For example, imagine three copies of the form being sent to three different people: Bob, Jane and Frank. The forms are completed by hand and sent back.
However, prior to document scanning, the pages are accidentally mixed up and the forms are scanned in the following order:
- Bob's page one
- Jane's page one
- Jane's page two
- Bob's page two
- Frank's page one
- Frank's page two
When TeleForm receives pages in this order, it will process Bob's page one but wait until the next available page two. However, it receives Jane's form. Unfortunately, if "page link" fields does not exist, Jane's page two will be linked with Bob's page one as TeleForm automatically links to a page two. In this example, Bob and Jane's form data will be intermixed.
A page link field should be added to the data capture form design. Put simply, a field is printed on every page to link them and prevent one candidate's page linking with another. A page link could be a first name ("Bob" printed on both his pages, "Jane" printed on both her pages, etc.). However, it is more common to use numerical page links where TeleForm is instructed to print form sets with incremental numbers.
To find out more about page links, and incremental numbering on prints, please contact us.
Test, test, test, test, test, test, test, ....
Rigorously testing the data capture form (printing, filling, scanning, exporting data) will allow you to identify design faults and problems that will influence how the form behaves.
Don't be afraid to create - and test several versions of your form. You will NOT get your form design correct first time! Once you are satisfied the data is reading and exporting correctly, you can delete old drafts and test versions.
Are there any guidelines on 'required free space' or 'exclusion zones' around cornerstones?
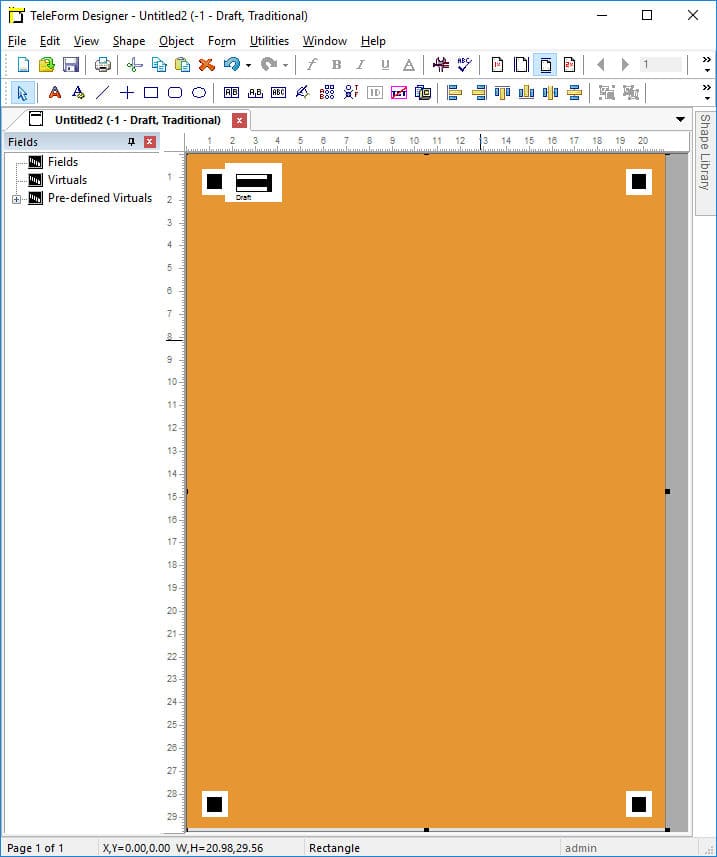
TeleForm requires about 5mm of white space around the cornerstones. To visualise this for external printers or colleagues, simply place a large coloured box over the cornerstones. You will notice the white space TeleForm enforces around each cornerstone (see below).
Look-ups
Why use look-ups?
The purpose of TeleForm is to read data from images and to export it to your chosen database. It can be configured to work without any human intervention, although the usual scenario is that it feeds images and data to the Verifier module to request user assistance whenever fields fail either recognition confidence or validation rules.
When fields are filled in incorrectly, there is a need to set validation rules that force TeleForm to pass the form for user-intervention. These may be simple checks for numeric ranges (for example on an age field), empty field checks (to ensure that a required field doesn't export any blank data) or a database lookup to validate that data conforms to your requirements prior to it being exported.
Database look-ups can be used for names, ID numbers, counties, etc. The idea behind database look-ups is simple:
- Read data from a field, asking a user to assist if the recognition engines are unsure about anything
- Prior to exporting the data, perform a lookup of the data contained in a field with that contained in a database table
-
- If the data matches, then allow the data to be exported to an export table
- If the data doesn't match, then issue a warning to the user so that they may decide how to proceed
How do I configure a field to use a lookup?
Look-ups can be used only on constrained print fields, image zones or capture zone fields. The example below uses an example of a Patient ID field (holding the identification code of a hospital patient).

Now, let's suppose that the field is filled in by a hospital patient. It is feasible, therefore, that the value they write in this field is incorrect for any number of possible reasons.
It is necessary for the hospital to process the form and ensure the data is assigned to a valid patient in the database. Provided they have a table in a database that contains all the valid Patient ID's, it is possible to configure TeleForm to perform a look-up on any data read for this field. The process is outlined below:
- Open the form in TeleForm Designer
- Open the configuration options for the PatientID field
- In the Validations tab, enable the Database look-up option. From the drop-down, select the database format in which the patient look-up data is stored (e.g. MS Access, or SQL Server via ODBC)
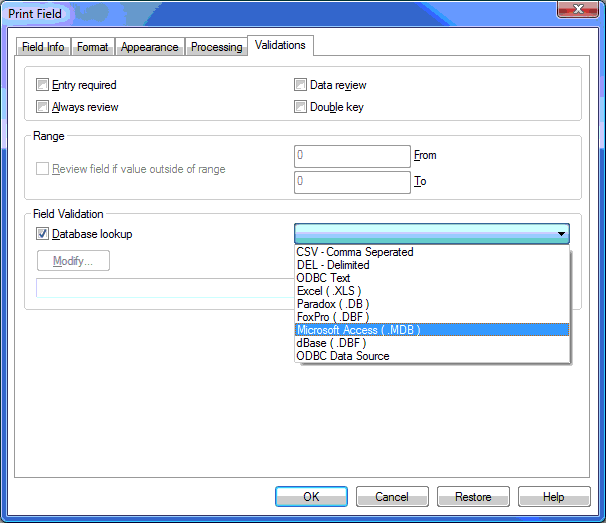
- Step through the configuration wizard to select the table and ultimately the field containing the look-up data. You will be asked at this stage if you want the lookup to be case-sensitive or not
- Once configured and saved, future processing will automatically perform a look-up.
Data import/export
I want to send the form design to someone else but I can't find the document on the system!
TeleForm differs from many other types of document creation applications. When you create a new form in TeleForm and save it, the design and configuration of that form is held completely internally to the TeleForm system.
If you need to send the form design to somebody else on the same network, and they have a TeleForm installation linked to the same TeleForm server, you will both be sharing the same forms - there is no need to send it. Any forms you create will be visible by the other TeleForm user.
If, however, you need to send the form design to a separate TeleForm system, for example to staff at ePC Technical Support, you need to effectively export a copy of the form from your system and e-mail the file so they can import a copy of the template on their system. The next few questions will describe the process.
I need to send a copy of the form to my printers for a bulk print run. Do I need to export it?
No, not unless they have a copy of TeleForm in their office too! The best way to send a copy of the form image to a print house is to generate either a high-resolution PDF or graphic. This can be done by performing a print to PDF, or by using the Copy to Clipboard feature of the Designer (in the Edit menu when you have your form open).
The Export/Import functions described in this section are not required.
How do I export a copy of the form design template from TeleForm?
If you need to send a copy of the form design template to an external user of TeleForm (including ePC Technical Support), or need to create a safe backup of your form(s) on a different server, please follow the steps below:
- Open up TeleForm Designer
- From the File menu, select Templates. For earlier versions of TeleForm, the option may be called Forms
- Browse through the internal directory structure of forms, and right-click on the template you want to export. Choose Export
- In the pop-up window, the Export Format drop-down allows you to select which file to export to. Wherever possible, choose TeleForm (TFT). If unavailable, please select the TFW option
- Click on the Properties button and choose a version of TeleForm which corresponds to the system importing the form. Note: if sending to our technical support team, please select the latest version
- Click OK
- Now choose a destination to store the exported file. Once done, click Export
- If you need to send this file on e-mail, copy and paste as an attachment.
How do I import a form design template into my TeleForm system?
If you have received a form design template via e-mail, or if you are restoring a backup, please follow the steps below:
- Place the TFT or TFW file on your PC desktop
- Open up TeleForm Designer
- From the File menu, select Templates. For earlier versions of TeleForm, this option may be called Forms
- Browse to an internal data folder where you can import the form. Right-click on the folder name and select Import
- If you want to maintain the data export configuration from the form design, enable the 'Preserve Auto Exports' field
- Click the Browse button to select the folder which contains the TFT or TFW file. Once selected, click OK
- Back in the Import window, the form title should be listed at the top - provided TFT or TFW was selected
- Click on the template in the list and click the Import button at the bottom. You may see a confirmation screen
- If the form already exists on your system, you will be asked if you want to replace the existing copy. You can choose to cancel the import procedure
- The import procedure is now complete and the form can be opened into the Designer workspace.
Note: Any merges set up for this form will be imported at this stage.
Data Auto Exports
What is a TeleForm Auto Export?
Forms processed through TeleForm can have their data exported to a number of destinations. Up to 16 different data exports can be configured for each form design.
- Raw data can be exported into database tables as well as text file formats
- Images can be stored and archived off, linked with filename data
- Reports can be produced and triggered
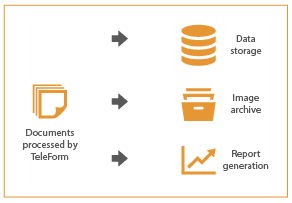
Data exports can be configured to many different formats, including:
- SQL, Oracle, dBase, Paradox
- Microsoft Access, Excel
- Any other ODBC-compliant data structure
- CSV (Comma Separated Values), DEL files (Delimited data), XML
- SPSS (SAV file)
- Your own custom formats (completely scriptable exports via VBA)
Image exports can be set-up to various formats, including:
- TIFF (single or multi-page formats)
- DCX
- JPEG
Any other image formats (using custom conversion scripts if required)
ePC have worked with various reporting tools (in conjunction to our eFlex module) including Access Reports, Crystal Reports and ActivePDF. With eFlex, users can configure tools to be automatically distributed to the right people within your business.
How do I set-up an Auto Export?
To set up an Auto Export, follow the procedure below:
- In TeleForm Designer, open up your form template
- From the Form menu, select Auto Export set-up
- Select the New button. Choose a data format for the export on the drop-down list. Click Save As... to choose a destination file/table for the data. TeleForm will create new data files during the first export. If exporting to a database, a new table will be set-up automatically by TeleForm if it doesn't already exist. All field types will be configured as required
- Next, click on the Fields tab and select which fields you want to export
- Click OK
- Finally, choose the newly-created export in the list and click the Enable option. Click OK to close the export configuration screen. Once you save your changes, the export will be active. Future processing will trigger the exports automatically.
Can I export data to Sage?
Efficient data capture is a key part of our solutions but the export of captured data to existing systems is equally important.
Although we support data exports to any ODBC compliant database, some applications with proprietary database formats can be a challenge to integrate with.
To assist you with your Sage 50 link requirements, ePC have created a series of easy-to-use functions that use Adept's Sage 50 integration tools to perform look-up and export tasks without having to write any code or adjust your existing systems.
Writing your own direct links with Sage 50 can be a highly complex and expensive task. Adept's impressive knowledge of Sage and our extensive experience of developing 3rd-party integration solutions means costs and complications are minimised.
Combined with ePC's integration components, you can now link your captured data with Sage 50 to:
- Verify against Sage 50
- Lookup missing account details, such as addresses and phone numbers from your Sage data
- Export billing data directly from captured proof-of-delivery documents such as timesheets
- Match invoices to your purchase orders within Sage 50
- Create new suppliers and customers within Sage 50 from application forms
- Automatically generate invoices from Sage 50 with timesheet images attached.
Data merges
What is a data merge?
If you are able to pre-populate your forms with data prior to distributing them, you can use a merge.
A TeleForm Automerge is used to take data from a database or datafile and to print it neatly onto a form, saving the need for certain fields to be handwritten. This saves time when filling the forms in and greatly increases recognition accuracy and efficiency.

TeleForm can merge text data into text fields, barcodes and images into Image Zones, and indeed prefill choice fields with data held in a merge database.
The Automerge Publisher application can be configured therefore to regularly monitor a data merge source (database table or datafile) for records in a pending status. Once found, it takes the field data and populates the data/images directly onto the form template of your choice.
You can configure a merge to distribute the populated form either to the printer, to email (with an attachment as an image or PDF) or indeed directly to your fax server.
Once each merge is complete, the merge database/datafile is updated to reflect that it has been done. Need a reprint? Just adjust the record to set it to pending again!
How do I set-up a data merge?
To set up a merge within TeleForm, please follow the steps below.
Firstly, create a merge database:
- Create an Access or Excel file (we recommend Access over Excel as it is better designed as a ‘database’). Give it a filename that is convenient for you to recognise in the future (for example to Access: Merge.MDB).
- Create a table in the Access file with a name that is similar to the name of your form (just to that you can recognise it again in the future)
- Create columns (fields) in that table that have EXACTLY the same names as the fields that you want to prefill on the form. This may mean you create only one or two columns, as many as you require
- In addition to these columns, you MUST create some additional ones which are used by TeleForm to keep track of the merged data:RECORD_STA (a number): this means Record Status, and TeleForm will look at this value and determine whether it needs to be printed, or whether it has already been printed. Values are: 23=Pending, 20=Done
-
- REMOTE_UID (a number): this means Remote User ID, however, regardless of what it means, values in here must be unique (they won’t be printed on the form). The easiest way to set this column up is to set it as “Autonumber” so that Access makes the field values unique itself without you having to worry about it
- (optional) TIME_STAMP (a date time): if used, this informs TeleForm WHEN to merge the data onto the form. If you are running a very large print-run for example, you may choose to merge all data during an out-of-hours date and time such that the printer doesn't hold up other print jobs
- (optional) SEND_TYPE (a number): if used, this will instruct the merge how to distribute the forms. 1=Fax, 2=Print, 4=Email, 8=Email with attachment, 16=Email with PDF
- Once you’ve created all the necessary columns you can now start putting data in. As a test, put value into your merge fields, and a value of 23 into the RECORD_STA field. You should see that the REMOTE_UID value fills automatically if you have it on Autonumber
- Save the Access file in a sensible location.
Now we configure TeleForm AutoMerge Publisher to regularly monitor the database:
- Open up TeleForm AutoMerge Publisher. From the Merge menu, select New... and then choose the form template that you want to merge data onto
- In the Setup window that then appears, choose Microsoft Access (.MDB) from the Format menu, and then click Merge From. Browse and select your Access file. For the Table, click on the listed selected table name you created above. Click OK
- In the settings, click Enable and As soon as possible and Printed
- Note: The printer chosen for this task will be the default printer for AutoMerge Publisher which is defined in the File menu)
- Click on the Fields tab. Scroll down the list and you should see the merge fields listed – mapped to the fields of the same names in your database
- If all looks ok, click on OK
- You should now hear your printer churning away with the single form print. Check that the merge fields are correct
-
If printed, now open up your Access database again and look inside the table. You should now notice that the single record is still there, but the RECORD_STA value has changed from 23 to 20. This is normal. Basically, a value of:
- 23=Pending
- 20=Done. If required, you could now change the value back from 20 to 23 and the form would print out again
Once the test merge works, it is now possible to add many more merge records to your database. From now on, whenever the AutoMerge application is running, and as long as your merge(s) are enabled, new merge records set to Pending will automatically be actioned.
Can I merge data to eForms the same as paper forms?
Each TeleForm system we implement offers optional electronic form (eForm) completion via a PDF or HTML versions of the paper forms. However, BPM and eForm solutions such as Process Director or LiquidOffice make the task of pre-filling forms simple but at a high cost in terms of deployment resources and software costs.
In such scenarios, eMerge allows simple and flexible pre-filling of TeleForm eForms within your website - at a fraction of the cost.
eMerge is an ASP.NET web application that utilises the Adobe PDF Toolkit (included with eMerge) to auto-populate field data into PDF eForms using data from a URL string. The PDF is returned back to the client as a pre-filled PDF form, ready for them to print or complete on screen for electronic submission.
Once installed on your web server, you can simply call the PDF form via a URL adding the pre-fill data in the following format (all on one line):
http://{ServerName}/eMerge.aspx?pdf=test.pdf&Forename=Sally&Surname=Smith
Everything after the question mark is a parameter (delimited by the “&” symbol).
The format of each parameter is [field name]=[field value].
The PDF parameter is always required, however the order it appears in the list of parameters is not important.
Scripting
What is TeleForm scripting?
TeleForm features a whole host of validation options to help ensure the exported data is of suitable quality. This maybe achieved by assisting the recognition engines or indeed by aiding the operators by flagging up or making automated decisions on incorrectly filled fields.
TeleForm's built-in validation options include features such as numeric range checking, database lookups and dictionary matching. However, in some cases, more advanced validation checking is required. In these situations, it is relatively straightforward to add a small amount of VBA script to your forms.
How does it work?
Imagine a questionnaire which asks the participant whether they hold a driving license and, if they do, how long they have held it for. Here, two fields are provided. The first (Driving_License) simply asks the question, giving a "Yes" or "No" response, and the second (Driving_Duration) holds a numeric value for the number of years.

There are 4 possible scenarios with this combination of fields:
- "Yes" ticked + a number of years provided. [Valid combination]
- "No" ticked + no years provided. [Valid combination]
- "Yes" ticked + no years provided. [Invalid combination]
- "No" ticked + a number of years provided. [Invalid combination]
For the first two valid combinations, the data can be exported without any modification. However, the last two invalid combinations may require additional decisions by the TeleForm operator. In this example, VBA is written to set fields for review if there are problems. This means that if "Yes" is ticked and the Driving_Duration field is empty, we ensure the operator is stopped at the Driving_Duration field to double-check the recognition.
Similarly, if "No" is ticked and a number of years are provided, the operator is stopped at the Driving_License field so that they can check the recognition on the choice field. Writing the 4 combinations in VBA gives the following script:
Private sub Form_Evaluate()If Driving_License.Choices(1).Value = True Then
'The Driving License field has been read as Yes, how about the duration?
If Trim(Driving_Duration.Text) = "" Then
'Problem: turn on Field Review flag for the Driving_Duration field
Driving_Duration.Status = Driving_Duration.Status Or tfFldReview
Else
'This is not a problem - the duration has been filled in
End If
Else
'The Driving License field is No (or blank), how about the duration?
If Trim(Driving_Duration.Text) = "" Then
'OK - the duration has not been filled in, which is good!
Else
'Problem: turn on Field Review flag for the Driving_License field
Driving_License.Status = Driving_License.Status Or tfFldReview
End If
End If
End Sub
Please note: bold text is commentary and not required.
The VBA validation rules shown above are placed into the Form_Evaluate subroutine. This means that they are only run once for each form - when it is first evaluated. However, the field status modifications ensure that when there are problems, the operators are forced to review the problematic fields.
How to create .NET scripts?
From TeleForm 10.5 onwards, it has become possible to integrate .NET (either C# or VB) script via TeleForm's COM Scripting API.
This section gives an overview of the concepts and provides examples of simple scripts. The following are required:
- At least TeleForm 10.5
- A copy of Microsoft Visual Studio. A free "Community" version is available here
- Local administrative rights to your PC
Overview
A Scripting API configuration screen is available (Utilities menu / Configuration / Global System / Scripting API) which allows you to configure custom Add-Ins with TeleForm. These add-ins can perform a multitude of tasks within the TeleForm application environment, such as:
- Custom scripted business rules that check fields and forms are filled in correctly
- Database lookups for forms and fields
- Custom exports and data integration with other back-end systems
- New recognition engines for custom tasks
- Custom batch scanning configuration screens
With previous versions of TeleForm, many of these functions were possible through Microsoft VBA integration (and more historically through BasicScript). Now, TeleForm's API has been opened up, allowing you to create more advanced custom functionality. Greater customisation is a good thing, however creating .NET scripts that link into TeleForm's API requires a greater knowledge of programming than previous scripting options. Knowledge and experience of Visual Studio is a definite advantage. The process is as follows:
- Create a new class library in Visual Studio (choosing VB or C#). Ensure it is COM-visible
- Add a reference to the TeleForm Scripting API Library
- Implement the tfscript.ITFScriptAddIn interface and other required interfaces (such as tfscript.ITFFormEntryPoints to gain access to the form processing entry points)
- Add your custom business rules in the relevant functions or subroutines
- Build your DLL (dynamic link library) file, giving it a COM GUID
- Open up the TeleForm Scripting API configuration screen and add your new add-in DLL name and GUID
- Choose how workstations are to register new versions of the add-in and save your configuration
This FAQ section describes each of the above steps and provides a small example script.
Create a new class library in Visual Studio or Visual Basic Express
If you do not have a full copy of Visual Studio available, a free "Express" version is available here.
We recommend using C# as there are more on-line examples available, however, the steps in the FAQ will still work in either language.
Firstly, create a new Class Library project. In the example below, we use the project name "VBExample"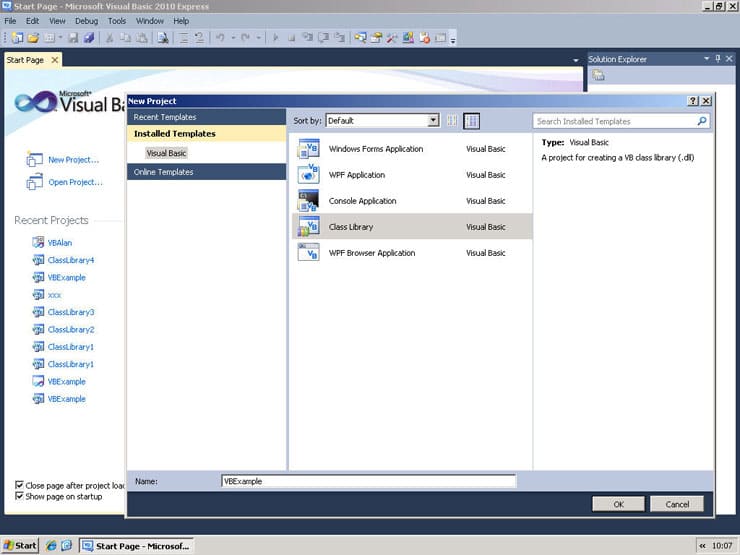
Once this has been created, choose Properties from the Project menu. Next, tick 'Make assembly COM-visible' from the Application tab: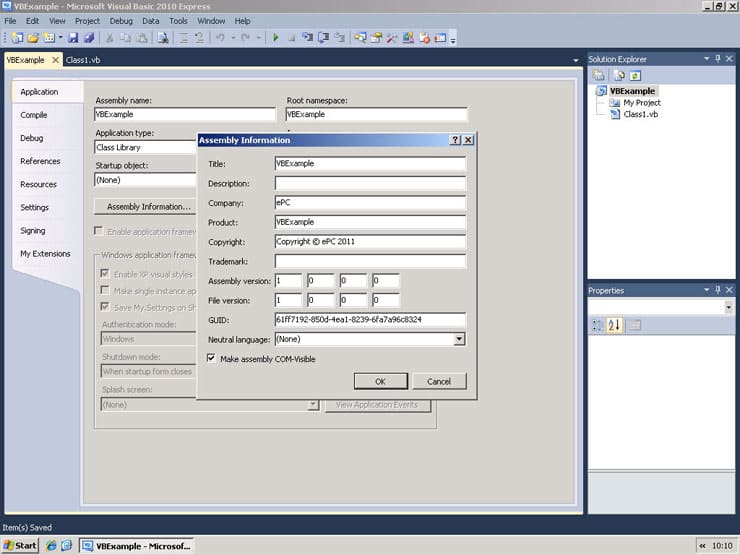
Adding a reference to the TeleForm Scripting API Library
The next step is to add the TeleForm Scripting API reference to the project.
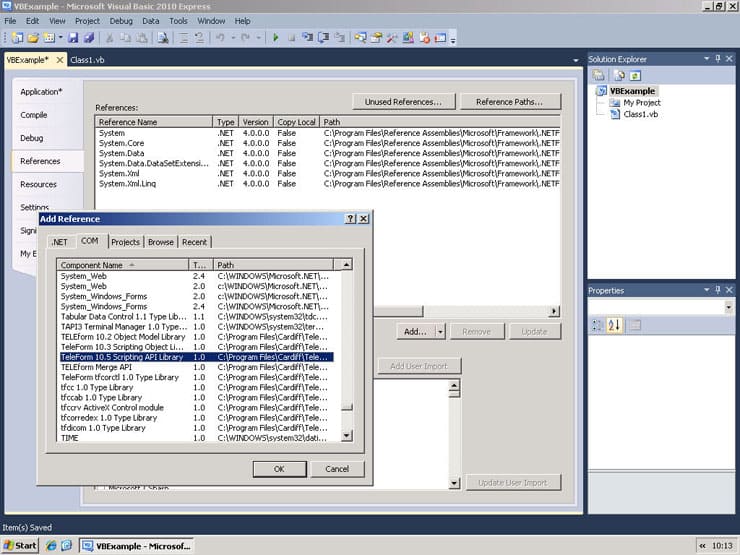
- Click on the Reference tab in the Properties window
- Click Add... button. A new window will open
- From the COM tab, find and select 'TeleForm 10.5 Scripting API Library'. Please note: TeleForm v10.5 and above will include the latest 'scripting API library' versions to select. Furthermore, if the 'TeleForm Scripting API Library' is not available, you will need to install a workstation copy of TeleForm on your PC
- Once selected, click OK.
Customise
We're now ready to add custom code to apply your business rules to the Add In.
The following script is added in the FormEntry subroutine.
It simply takes 3 fields: Day (values 1-31), Month ("JAN" to "DEC") and Year (as a 4-digit year) and concatenates them together into a proper date in the format DD/MM/YYYY to be placed into a field called simply Date.
Public Sub FormEntry(ByVal nContext As tfscript.TFFormEntryContext, ByVal nSubContext As_
tfscript.TFFormEntrySubContext) Implements tfscript.ITFFormEntryPoints.FormEntry
If nContext = tfscript.TFFormEntryContext.TFFormEntry_PreExport Then 'Runs before export
Try 'Using Try in case Date, Day, Month or Year fields do not exist on form
Dim ExportDate As tfscript.ITfField
ExportDate = Form.Fields("Date") 'The ITfField object is read/write
ExportDate.Text = Format(Val(Form.Fields("Day").Text), "00") & "/"
'Line above sets Date field to the day (with leading 0 if required) followed by / (e.g. 23/)
Select Case Form.Fields("Month").Text
'Line above, depending on the Month value, appends the numerical form (e.g. 23/04/)
Case "JAN"
ExportDate.Text = ExportDate.Text & "01/"
Case "FEB"
ExportDate.Text = ExportDate.Text & "02/"
Case "MAR"
ExportDate.Text = ExportDate.Text & "03/"
Case "APR"
ExportDate.Text = ExportDate.Text & "04/"
Case "MAY"
ExportDate.Text = ExportDate.Text & "05/"
Case "JUN"
ExportDate.Text = ExportDate.Text & "06/"
Case "JUL"
ExportDate.Text = ExportDate.Text & "07/"
Case "AUG"
ExportDate.Text = ExportDate.Text & "08/"
Case "SEP"
ExportDate.Text = ExportDate.Text & "09/"
Case "OCT"
ExportDate.Text = ExportDate.Text & "10/"
Case "NOV"
ExportDate.Text = ExportDate.Text & "11/"
Case "DEC"
ExportDate.Text = ExportDate.Text & "12/"
End Select
ExportDate.Text = ExportDate.Text & Form.Fields("Year").Text
'Line above appends the year (e.g. 23/04/2012)
Catch ex As Exception
MsgBox("Error:" & Err.Description) 'Display a message if an error occurs
Exit Sub
End Try
End If
End Sub
Building the class library and adding a COM GUID
In order for a TeleForm application to be able to communicate with the new .NET script (a class library), a GUID must be associated with it and visible in the COM. Visual Studio offers a tool to generate a new GUID but websites such as Guid Generator offer the same service.
GUID (or UUID) is an acronym for 'Globally Unique Identifier' (or 'Universally Unique Identifier'). It is a 128-bit integer number used to identify resources. 128-bits is big enough and the generation algorithm is unique enough that if 1,000,000,000 GUIDs per second were generated for one year the probability of a duplicate would be only 50%.
This GUID is used to associate with our new library (DLL).
To instruct Visual Studio to use a new GUID, use the code below in the Class definition:
<Guid ("B5F4EE9E-9064-4B6D-A672-329C38853B0B"), ClassInterface (ClassInterfaceType.None), ProgId
("VBExample.VBExampleAddIn")> -
Public Class VBExampleAddIn
Your own unique GUID will appear in the quotes.
You are now ready to Save and Build your Add In. To do this, right click on VBExample project in the Solution Explorer and select Build VBExample.
The resulting DLL will be visible in your project directory, for example:
C:\Users\<yourlogin>\Documents\Visual Studio 2010\Projects\VBExample\VBExample\bin\Release
This file location will be used in the next step.
Configuring TeleForm Scripting API to use your new class library
We have successfully created a new Add In and TeleForm needs to upload the required DLL when needed.
Open up any TeleForm module and select Configuration from the Utility menu. On the configuration screen, choose the Global System tab followed by the Scripting API tab. A set of pre-installed Add-Ins will appear. Click New to configure the VBExample Add-In.
The following screen should appear:
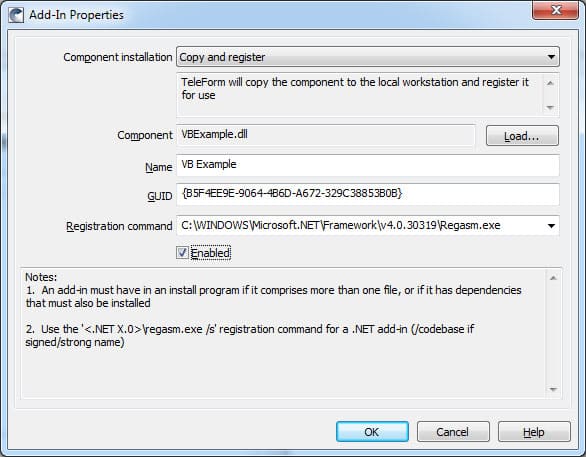
The following settings have been adjusted:
- Component Installation: copy and register. The VBExample.dll will automatically be copied and registered using the Registration Command (configured below) on workstations
- Component: click the Load button to browse to the VBExample project directory (from the last step)
- Name: this has been manually set to VBExample
- GUID: The GUID from the last step has been pasted manually
- Registration command: this command will register the DLL with the current PC's COM. Please note: the path of Regasm is dependant on the version of .NET that the project was compiled in. In TeleForm 10.5.2 (build 10555) and above, the path of the RegAsm command can be simplified using the notation <.NET 4.0>\regasm
- Enabled option: this has been ticked.
Upon clicking OK, you will immediately check the setting and receive a message in the event of an error.
If the Add-In has not been previously installed, it will automatically copy and register locally on workstations. Updated versions of your Add-In DLL must be placed in <TeleForm Mapped Drive>:\TeleForm\Scripts\AddIns to be automatically distributed across workstations.
Final configuration notes
Following the steps outlined in this FAQ section will ensure your Add-In runs for every TeleForm application (i.e. every form / batch) when enabled.
Some business rules may be required for individual forms. If so, please check the FormID value before applying business rules logic.
Further documentation on all API objects, methods and properties are found in:
<TeleForm Mapped Drive>:\TeleForm\Doc\SDK\COM
Note to editors: Please feel free to reproduce FAQ information in whole or part but we do request that you credit ePC and place a link back to our website whenever information is reproduced.
The FAQ's are compiled on the basis of questions received by ePC. If you have a question, please contact us.
Note to editors: Please feel free to reproduce FAQ information in whole or part but we do request that you credit ePC and place a link back to our website whenever information is reproduced.
The FAQ's are compiled on the basis of questions received by ePC. If you have a question about BPM software, please contact us.
