How to design paper surveys for scanning

Learn how to design paper surveys for accurate recognition and interpretation by paper survey scanning software. The guidance in this blog is also useful for those who manually process returned data.
Today, staff spend a great deal of their time designing paper forms and collecting data which is then manually transcribed into spreadsheets or databases for processing and analysis. The manual processing of data decreases efficiency and reduces accuracy by introducing the risk of transcription errors. It is time-consuming and diverts resources away from core activities.
Fortunately, solutions to automate paper based processes are readily available and in use. At ePC, we have over 20 years’ experience in document capture and have supplied data capture systems such as TeleForm and ABBYY to NHS trusts, local councils, FTSE companies, and more.
As part of this work, we regularly review new form designs or design paper surveys for customers.
Paper survey design
Based on our experience, here are some thoughts on how to design form templates to improve form processing, reduce manual intervention, and increase capture rates with paper survey scanning software.
Quick links
#1 Use constrained print fields
#2 Use choice fields
#3 Provide clear instructions
#4 Use black ink
#5 Make form fields large enough
#6 Use a form ID block
#7 Do not obscure errors
#8 Add a signature
#9 Capture comments
#10 Consider adding a barcode
#11 Only collect data that is required
#12 Set up bespoke rules
#13 Merge data onto paper forms
#14 Focus on the layout
#15 Test
#1 Use constrained print fields
Constrained print fields are designed to gather data such as names, dates, and numeric values. The form fields provide one space for each character in the response with data captured using intelligent character recognition (ICR) technology. Each space is bound by lines to guide respondents to enter data correctly in the assigned spaces.
There are three types of constrained print fields:
Standard fields
These fields consist of sequential boxes.
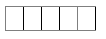
Comb-style fields
These fields consist of short lines between each character. You can modify the height of the comb lines.
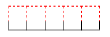
Templated fields
Templated fields can be either full boxes or comb-style in appearance, but they include separator characters to distinguish between elements of the field. For example, the day, month, and year of a date field.

#2 Use choice fields
Choice fields consist of a list of options and can be set up for a single or multiple choice response. The respondent will select their preferred choice from the available options with response marks detected by OMR (optical mark recognition) technology. Examples of choice fields include:
- Yes/no responses
- Gender responses
- Satisfaction scoring (e.g., unsatisfied, neutral, satisfied, on a scale of 1 to 10, or Likert scale)
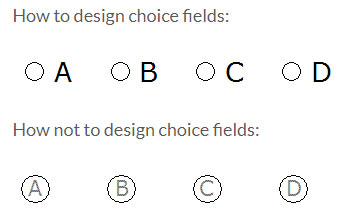
Choice fields include a variety of different styles to choose from:
- Bubbles: these are small circles or ovals. Expected inputs are full shading, crosses, or ticks
- Boxes: the small squares or rectangles have expected inputs of crosses or ticks
- Underlines: less frequently used with survey scanning software displaying a small horizontal line on which the expected input is a tick
- Responses: these types expect the choice text to be circled. These were common a few years ago for Title style fields (Mr, Mrs, Miss, Ms, etc.)
- Brackets: very seldom used. Data collection software will print a pair of brackets on the page with the expected input being a tick or a line between them.
The above are listed by popularity and also by preference. It is much better, from a recognition/accuracy point of view, to use bubbles rather than underlines, responses, or brackets. Bubbles and ovals encourage respondents to fill/shade in the area. This is easier for both data capture software and data entry teams to identify when compared to marks, underlining, and circling that respondents may use with the other response options.
We advise avoiding the use of letters, numbers, and shading on choice fields as it can affect recognition. It is always best to leave them empty so that any marks within the boxes or bubbles will be made only by the person filling in the form.
#3 Provide clear instructions
To reduce the risk of errors, you should consider “guiding” your respondents by providing instructions for completing the paper form. For example, record dates in day/month/year format e.g., 05/04/2022 and log time in the 24-hour clock e.g., 16:00. Labels near the field or pre-filled characters can help guide the user in filling in the form.

#4 Use black ink
We recommend asking respondents to use a black pen and write in CAPITAL LETTERS to aid accurate recognition. You will always get some people using other colours, or writing in lower-case, but the time saved on the majority will outweigh a few minutes spent here and there correcting poorly completed paper based surveys.
#5 Make form fields large enough
Response areas that are too small or too large can be hard for respondents to select/fill in.
For choice fields, a response mark that is too small can make it difficult for a respondent to fill in at all. A response mark that is too big may not be sufficiently filled to read accurately because a respondent does not want to spend a lot of time darkening the entire oval or making an X mark large enough to cover the space inside the mark.
With image zones, sometimes respondents write outside the border because they feel the available space is too small so make sure the field is large enough to collect the information.
#6 Use a form ID block
We recommend adding a form ID block to each page of the form template.
The default position for form ID blocks is the top left of every portrait page. Unfortunately, staples, folds, and rips often occur in this position.
The best solution (space permitting) is to place the form ID blocks in the top left and bottom right corners of the page. If a Form ID block is damaged, the alternative may still be readable. This helps reduce form identification problems. For optimum recognition, form ID blocks must be kept clean for document scanning with white space surrounding it.
#7 Do not obscure errors
We recommend providing respondents with clear instructions for what to do if an error is made.

#8 Add a signature
The paper based survey will need to be completed before it is returned for processing, and it may need to be signed to be considered complete.
Our data capture software will calculate the fill percentage of the field to determine whether it was signed or not. Signature fields will be extracted and stored as an image.
#9 Capture comments
While it is preferable to avoid free text, paper survey scanning software can capture comments by storing an image of the comments zone. You should always question what you will do with these captured images though; if they are to be reviewed and acted upon, they may be necessary, but they offer little value for any kind of statistical analysis.
#10 Consider adding a barcode
If you are pre-filling respondent details, or wish to reconcile outbound and returned forms, a barcode can be added to the form containing a unique respondent reference code. This way you will not need to re-read the pre-filled data back from the form when you receive the returned form as you can look it up based on the unique barcode value.
Additionally, barcodes offer a robust way of linking the pages of multi-page forms, avoiding mixed-up forms! Simply pre-print the survey forms with a sequential number barcoded onto each page and use this barcode as a page linking field within your survey template. This will guarantee that the wrong page one will never be assigned to the wrong page two.
#11 Only collect data that is required
Do not collect unnecessary data and avoid recording the same data more than once on the paper questionnaire. This is particularly relevant in clinical trials where case report forms (CRF) should only capture data points that answer the trial objectives/protocol or when collecting data covered by GDPR.
#12 Set up bespoke rules
Paper survey software can check form data is correct before export by validating information against other systems (e.g., databases, web services). Simple rules can be checked with any unrecognised fields/characters queued for human review. These rules include alpha, numeric, dictionaries, date ranges, look-ups, and mandatory fields.
As an example, data capture solutions will check that words have been spelt/recognised correctly. The county of Surrey may have been misread as “SVRREY” with the software instructed to make automatic corrections.
Additionally, you can apply conditional logic rules to the extracted data to ensure that invalid responses are not exported (e.g., values outside prescribed or expected parameters/ranges).
#13 Merge data onto paper forms
In some sectors, it is helpful to pre-print variable data onto the form before distribution. For example, you can pre-print individual pupil details (name, school, date of birth) and test date/location on an 11+ entrance exam. Other examples include adding a patient ID for clinical trials. You can also add a sequential tracking number or barcode to link multi-page forms.
#14 Focus on the layout
Pay attention to the form layout. Some tips:
- Provide clarity by using headings and sections
- Minimise clutter and use plenty of white space
- Focus on a logical order
- Apply consistent fonts, page margins, and spacing
- Specify units of measurement
- Questions should require an explicit response (i.e., not responding ‘Yes’ is not an implicit ‘No’; the user must select ‘Yes’ or ‘No’)
#15 Test
Rigorously testing the data capture form (printing, filling, scanning, exporting data) will allow you to identify design faults and problems that will influence how the form behaves.
Do not be afraid to create a survey – and test several versions. You will NOT get your questionnaire design correct the first time! Once you are satisfied the data is reading and exporting correctly, you can delete old drafts and test versions.
Form printing
Once approved, the forms need to be printed.
We recommend printing on duplex laser printers or using a commercial printer. You should print on 80 - 100gsm paper and avoid gloss/silk paper as many pen types can easily smudge on glossy paper.
We are always happy to advise on print quality and colour usage to ensure it is appropriate for the intended use. For example, if the form is an OMR sheet for a paper based exam, the paper must be resilient to the use of erasers and not smudge as well as be suitable for scanner use (e.g., correct drop-out colours, thick enough paper to prevent show-through, etc.).
Document scanners
The selection of a high-speed document scanner is key to the whole data capture process.
Our data capture systems support ISIS (Pixel), Kofax and TWAIN-compliant scanners. The type of document scanner needed will depend on your throughput.
We can recommend a range of document scanners that offer support for:
- Duplex scanning
- Colour scanning
- A4 or A3 page support
- Automatic sheet feeders
- High throughput of over 100 pages per minute
At the lower end, the Canon DR-C240 can scan paper surveys at a rate of 45 pages per minute (ppm). Mid-range scanners such as the Canon DR-6030C include A3 support and perform survey scanning at 80 ppm while higher-end scanners, such as the Kodak Alaris S3140 MAX, are capable of processing 140 ppm.
In most cases, we recommend scanning survey forms at 200 DPI in black and white only.
Conclusion
We hope this article has given you fresh ideas and inspiration for the next time you design a paper survey.
Are you looking to capture survey data more efficiently and reduce manual data entry? Discover our automated data capture solutions or call 03300 100 000 to discuss your requirements.